
Storyboards
How to use "storyboarding" or equivalent script-writing processes to design effective videos
Storyboards are graphic organizers in the form of illustrations or images that are displayed in sequence for the purpose of pre-visualizing a filmed video, animation, motion graphic, or other interactive media sequence. Storyboards are also used in the development of comic books and motion pictures. In fact, storyboards are credited to being developed by the Walt Disney studios in the 1930s. Storyboarding is the process of developing a story sequence with accompanying images, video sequences (described at this stage with still images), audio and narration (provided at this stage as text). For example, in the film "Argo", the characters use visual storyboards to fake evidence that they are in the process of producing a movie (while in reality they are attempting to free American hostages from Iran).
Introduction to storyboards
A storyboard is created prior to video production, and serves to visualize the main elements of the video in sequence, thereby organizing the story and scenes and simplifying overall editing and planning. In some ways, it is similar to an outline for a written paper, in that it allows the narrative to be organized and thought through ahead of time. Knowing ahead of time all the scenes you need to film allows for more efficient planning, resource gathering, and set/location development and use.
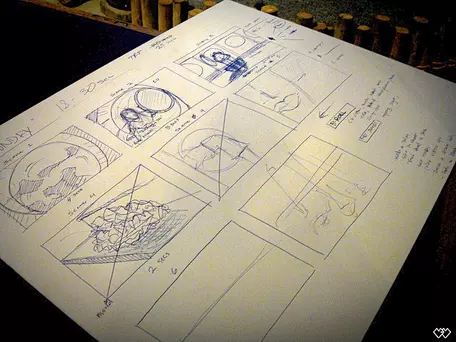
A storyboard is often based on sketches that are intended to depict what will be shown on screen. In lieu of sketches, storyboards could contain photographs, screen captures, or text descriptions. If only text is used, the storyboard becomes something more like an annotated script, where the narration text is placed next to notes about the various visual and audio clips that will be associated with it. Examples:
- Storyboard example from Ander Sundell: Storyboard Sketch-Up (Acrobat (PDF) 319kB Apr4 14)
- Annotated script example from Katryn Wiese: Annotated Script (Acrobat (PDF) 110kB Sep12 14) )
Benefits of storyboarding
Some of the benefits of using storyboards include:
- Saves time, because you get to see all the scenes you plan to film, all the audio you plan to record, and all the images and animations you plan to find or produce before devoting resources to development. During this process you may realize that certain scenes or graphics build upon each other and can be developed in tandem or sequence.
- Improves your overall understanding of your project and its most important message(s), because before getting lost in the details you are spending time visualizing the final product.
- Simplifies experimentation with changes in the storyline -- including the order and development of ideas -- because you can move pieces around.
- Integrates audio, video, and graphics in a deliberate way (thus taking greater advantage of all these mediums).
- Makes closed-captioning easier (because you have a script).
- Increases the likelihood that you will deliver the message you really want to, clearly, succinctly, and effectively.
How to create a storyboard
1. Overarching Thoughts - starting a storyboard
- Answer a few questions about the reason for the film: what is the overall message you want to deliver? Who is your audience? Why should they care?
- Follow the concept with a script. Tell your story.
- Divide your script/story up into discrete sections that can be accompanied by visuals and sound effects. Each section can be a different page or panel, which together tell your story, kind of like a comic book.
2. Best practices of a storyboard
- Finish your storyboard before filming anything.
- Use your storyboard to communicate with others the blueprint of the project; encourage feedback and get consensus before filming and editing.
- Be sure your storyboard captures the interest of the viewers and makes the point of the film clear.
- Find ways to make your storyline interactive: lead the viewer to anticipate content.
- Use your storyboard to hash out details, plan specific shots, and weave content into the theme.
- Your storyboard should convey some of the following information:
- What characters are in the frame, and how are they moving?
- What are the characters saying to each other, if anything?
- What emotional impact is planned?
- How much time passes with each frame of the storyboard?
- Where is the "camera" in the scene? Close or far away? Is the camera moving?
- The storyboard should change, probably drastically, as the revision process goes on.
- The final draft should contain several components for each film segment, such as:
- Learning objective(s)
- Technical details (lighting, camera angle, background)
- Content
- Time between frames of the storyboard
- Dialog and narration
- Set location and time of day
3. How do I make a storyboard? Tips to get Started
- Think of a storyboard as your grocery list and dinner plan, including recipes.
- Most commonly, storyboards are drawn in pen or pencil, but you can also use a computer.
- Spend just a few minutes drawing each frame.
- Use basic shapes, stick figures, and simple backgrounds. Drawing storyboard frames on index cards or PowerPoint slides allows for easy rearranging of the story.
- Blank storyboard template (Microsoft Word 2007 (.docx) 42kB Apr3 14)
4. Storyboarding tools
- Existing storyboarding tools: Silk, DENIM, and DEMAIS support interaction scenarios.
- For paper/Word examples, see the "Templates" section below.
5. Storyboarding language and vocabulary
- Close-up shot: A close range of distance between the camera and the subject.
- Dissolve: A transition between two shots, where one shot fades away and simultaneously another shot fades in.
- Fade: A transition from a shot to black where the image gradually becomes darker is a Fade Out; or from black where the image gradually becomes brighter is a Fade In.
- High camera angle: A camera angle that looks down on its subject; this technique tends to make the subject look small, weak or unimportant.
- Jump cut: A rapid, jerky transition from one frame to the next, either disrupting the flow of time or movement within a scene or making an abrupt transition from one scene to another.
- Level camera angle: A camera angle that is even with the subject; it may be used as a neutral shot.
- Long shot: A long range of distance between the camera and the subject, often providing a broader range of the setting.
- Low camera angle: A camera angle that looks up at its subject; this technique tends to make the subject seem important and powerful.
- Pan: A steady, sweeping movement from one point in a scene to another.
- POV (point of view shot): A shot that is understood to be seen from the point of view of a character within the scene.
- Reaction shot: 1) A shot of someone looking off screen. 2) A reaction shot can also be a shot of someone in a conversation where they are not given a line of dialogue but are just listening to the other person speak.
- Tilt: Using a camera on a tripod, the camera moves up or down to follow the action.
- Zoom: Use of the camera lens to move closely towards the subject.
Examples
Working in Word: from Al Trujillo
Examples of the storyboarding process completed in Microsoft Word. These examples show the provision of narration for the verbal, pictures/graphics for the visual, and description of details of the shot.
- Animation Storyboard Isostatic Adjustment -- Step 1: Isostasy Storyboard Draft A -- Trujillo (Acrobat (PDF) 307kB Sep21 14) This is what I initially submitted to the Pearson animations team for the development of an animation. This is really just an "ideas" document.
- Animation Storyboard Isostatic Adjustment -- Step 2: Isostasy Storyboard Draft B -- Trujillo (Acrobat (PDF) 385kB Sep21 14) This is what my media editors at Pearson and I created based on the "ideas" document above. Note that this is a true storyboard with time-syncing to the animation as it is developed.
- Animation created from the above storyboards. There is some interactivity in this animation as you load/unload shipping containers on a ship. Note that you'll probably have to play this in Chrome or Firefox to get it to work correctly.
The storyboard is a typical second step of a video production. It follows after the genesis of the concept for the video. Templates to create storyboards are generally flexible and adaptable to fit a wide array of concepts. Storyboard templates can be found for specific types of videos, animations, live activities, and other forms of expression. Since a storyboard is simply a story of the video or animation told frame by frame, templates and tools usually provide a generic way to capture each frame and then that frame capture can be copied and used over and over to make the entire storyboard. Tools to create a storyboard include printed forms and sketchbooks, giant post-it notes, Microsoft PowerPoint, fillable Adobe PDF forms, commercial and free software (examples: Storyboard That, StoryBoard Pro), and of course apps for iPhone and iPad. Regardless of the tool, visual, oral, and animation effects are key information to include for each frame in the storyboard are the visual, oral, and animation effects. Searching YouTube.com for storyboarding videos provides numerous examples of templates used to create storyboards for films, written materials, and more.
A Beginners Experience in Storyboarding:from Ander Sundell
When I began this project I had never put together a storyboard. I have put together many Microsoft PowerPoint presentations but that format is pretty limited when compared with what you can do with video.
The first thing I did was to find some storyboard templates online (there are plenty of free ones), open the lecture that I wanted to "convert" to video, and start sketching.
On my first run I just mostly wanted to organize my thoughts. I did not pay a lot of attention to the specifics of animation, effects, or script. I just jotted down the "essence" of what I wanted each scene to involve.
After I had this initial framework I was then able to go back and put more time into the design and specifics of each scene. This not only forced me to plan animations and effects, it also allowed me to come up with the basics for a script.
I see the script as a guide at this point. Knowing my lecture style I would imagine that there will be a pretty healthy dose of improvisation.
As the more revised storyboard continues to grow, I already find myself wanting to add scenes. For example I think that I should add a live video scene for me to introduce myself. There will be some live shots later in the video and I think that it would be awkward to have that be the first time that the viewer gets to see the "narrator."
Still plenty more to do! My examples:
- Before: Storyboard Sketch-Up (Acrobat (PDF) 319kB Apr4 14)
- After: Storyboard Stage 2 (Acrobat (PDF) 1.3MB Apr4 14)
Using Templates
Storyboard templates provide structure to how the basic information is presented. There are many terms and concepts that may be provided with templates to help organize and standardize the storyboard.
Nearly limitless blank templates can be found on the Internet:
One can also turn to Apple Pages and other software for templates to create storyboards. And Apps for iPhone, IPad, etc. are available that provide templates or help you create storyboards. A useful review of Storyboard Apps with recommendations is available to help you select the best App for your needs.
Additional Resources
- Sketch examples of storyboarding -- Ohio State University
- One of Al Trujillo's oceanography tutorials that used Microsoft PowerPoint as a storyboard (topic: transform faults vs. fracture zones)
- Storytelling framework for the Web (slideshare presentation)
- Several of the March 2014 workshop "How to Make a Video" presentations included demonstrations of the storyboarding process:
Original content for this page was contributed by: Charles Carrigan, Ron Harris, Ander Sundell, Al Trujillo, Alan Whittington, Laura Guertin, and Steve Burian during the Spring 2014 virtual workshop on Designing and Using Video in Undergraduate Geoscience Education. Our growing community of contributors continues to add to these resources.