Part 2: Stack and Animate Time-Series Images1 2

Introduction to ImageJ Stacks
Intro to Stacks

What is a stack?

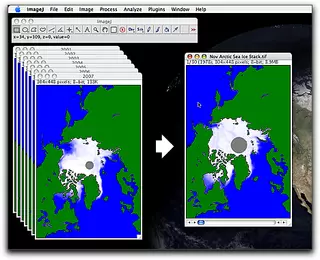
ImageJ can display two or more images in a single window, as a stack. The images or layers that make up a stack are called slices. Stack windows have a scroll bar across the bottom to cycle through the slices, and you can animate the images at a speeds from one frame every 10 seconds to over 1000 frames per second. Many operations, such as selecting, filtering, thresholding, and contrast enhancement can be applied to all slices in a stack.

To stack a set of images, they must all be the same width, height, and bit depth. The number and size of the images you can stack depend on the amount of memory in your computer.


What are stacks used for?

Stacks are used to display and analyze images that are related to each other in some way, such as by time (temporal), space (spatial), or color (spectral). Stacking temporal images allows you to animate them to rapidly display them in sequence making changes over time easier to see and understand, and allowing you to precisely measure the same regions of the image over time. Stacks of spatial data can be animated and measured, but you can also use ImageJ to construct entirely new views of features in the images. Using spectral data, you can use ImageJ to create both natural and false color views of a scene.

Time-series images represent data collected for the same region but at different times. Stacking these images helps you to visualize change over time. Stacks can be saved in several formats, including animated gif for web display and, with the appropriate software installed, QuickTime movie format.


Create a Time-Series Stack with ImageJ

Create a stack from a sequence of images

  1. Choose File > Import > Image Sequence... and navigate to the Albedo folder.
  2. Open Image Sequence
  3. Select the first image in the sequence and then click the Open button.
    Open Image Sequence Box
  4. Specify the Sequence Options. Use all twelve slices, beginning with the first slice and incrementing by one. Do not scale the images. Check the Sort Names Numerically option and click OK.
    Sequence Options  Box

  • All twelve images will be imported into a stack named Albedo. The individual images in a stack are called "slices" in ImageJ. The window's status bar shows the number of the current slice and total slices (in this case, slice 1/12 or 1 of 12), the width and height of the image in pixels, and the memory occupied by the stack, in this case 12 MB.
  • Choose File > Save to save the stack as Albedo.tif.
  • If you had difficulty creating or saving the stack, right-click (Win) or control-click (Mac) here (TIFF 8.9MB Jan13 10) and download the Albedo stack.

    Explore Basic Stack Functions

    The albedo images from January 2009 through December 2009 are now assembled into a stack.

    Animate the stack

    Albedo Stack image

    You can step through a stack one slice at a time, or you can animate it like a repeating movie loop. ImageJ lets you control the speed of the animation, so you can show it at a speed that is best suited for viewing.

    1. The animation is probably going too fast to see what's going on. To slow it down, choose Image > Stacks > Tools > Animation Options....
      image stacks animation options
    2. The Animations Options window opens. Set the Speed to 5 frames per second, and click OK.
      animation_speed_3

    Movie Icon

    Experiment with changing the speed of the animation, carefully observing the albedo changes that occur during the year.


    Add and delete slices

    What if you need to add or remove a slice from a stack?

    1. Click on the stack to stop the animation. Flip through the stack to where you want to add the new slice. Choose Image > Stacks > Add Slice.
      add_delete_1
    2. A new slice is added. Notice how the slice counter displays 5/13, indicating you are now on slice 5 of 13 slices.
      add_delete_2
  • To delete a slice, flip to the slice you want to get rid of and choose Image > Stacks > Delete Slice.
  • Movie Icon

    Unstack and restack slices

    1. To unstack the slices into separate image windows, choose Image > Stacks > Stack to Images.
      unstack_stack_1
    2. Each slice of the stack is now in its own window.
      unstack_stack_2
  • To restack the images, choose Image > Stacks > Images to Stack.
  • Movie Icon

    Interpret Your Results

    As you and your students explore time-series images, think about the patterns that you are observing. What do they mean? What do the data show?


    Create a Montage from a Stack

    ImageJ Montage

    Stacks are great on your computer screen, but how do you represent the image series in a printed report? The solution is to create a montage rows and columns of thumbnail images on a single page to save and import into your report.

    1. Choose Image > Stacks > Make Montage... make_montage_1
    2. The Make Montage window opens. Enter 3 for the number of Columns, 4 for rows, and .50 for the Scale Factor. Make the First Slice 1 and the Last Slice 2. Increment the montage by 1. Use 2 for the Border Width and 10 for the font size. Check Label Slices and click OK. make_montage_2
    3. Here is what the montage should look like. make_montage_3


    Movie Icon
  • Close all of the open image and stack windows before continuing.
  • Quit ImageJ.
  • Create a Stack from a Montage

    glacial_retreat

    What if you download a montage of two or more images combined in a single window, and want to turn them into a stack to animate them? The important thing to keep in mind is that all of the images need to be the same width and height to stack them.

    1. Choose File > Open..., navigate to your Day 2 folder, and open the glacial_retreat.jpg image.
      montage_to_stack_1
    2. Use the Rectangular selection tool Rectangular Selection Tool to carefully select a rectangle around the 2001 glacier image. Then choose Image > Duplicate to create a new image window from your selection.
      montage_to_stack_2
  • Click the Window menu and choose the original glacier image from the list of open windows at the bottom of the menu. (Be careful not to click on the image outside the rectangular selection. If you do, and accidentally cancel the rectangular selection, choose Edit > Selection > Restore Selection to bring it back.)
  • Drag the selection rectangle up to the second glacier image and carefully align it with the edges of the 2003 image. You can nudge the selection rectangle a pixel at a time in any direction using the arrow keys on your keyboard.
  • Choose Image > Duplicate to create a new image window from your selection. Then continue this process until you have duplicated all three glacier images.
  • Close the original window containing the three glacier images.
  • Choose Image > Stacks > Images to Stack. Flip through or animate your stack.


  • Movie Icon
  • Save your completed stack to your Day 2 folder.
  • Close all of the open image and stack windows before continuing.
  • If you had difficulty creating or saving the stack, right-click (Win) or control-click (Mac) here (TIFF 1.3MB Feb13 10) and download the Glacial Retreat stack.


    Your Assignment: Create Your Own Time-Series Stack


    1. Use the set of images that you downloaded in Part 1 to create a stack.
    2. If you prefer, you an also create a stack from other images, such as the Earth Observatory, Worlds of Change collection.
    3. To share your stack with your colleagues, make a montage from your stack and save it as a Jpeg to post. In addition, save the stack as an Animated Gif to post. Depending upon browser capability, some course participants may be able to see the animated gif playing when they click on the link to the file in your post. Do not be concerned if your animated gif shows up as a still image. The SERC CMS does not always handle these file correctly. As long as you have attached the montage, others will be able to view what you created.
    4. Then go to the Part 2: Share and Discuss page and post both the jpeg montage of the stack you created plus the animated gif along with a description of what you created. You should also share ideas about how you might use it or similar animations to teach change-related concepts or other processes to your students, engaging in an online discussion with colleagues.


    Source

    1Adapted from Earth Exploration Toolbook chapter instructions, "Using NASA NEO and ImageJ to Explore the Role of Snow Cover in Shaping Climate" under Creative Commons license Attribution-NonCommercial-ShareAlike 1.0.
    2Adapted from Eyes in the Sky II online course materials, Copyright 2010, TERC. All rights reserved.
    3New material developed for Earth Analysis Techniques, Copyright 2011, TERC. All rights reserved.


    « Previous Page      Next Page »