Part 1: Spatial Calibration and Measurement2
Introduction to Measuring in ImageJ

On Day 1, you learned that a digital image is a string of numbers, displayed in a rectangular array, according to a lookup table. You also learned about the three dimensions of an image — width, height, and bit depth. The power of image processing is its ability to make measurements in these dimensions:
Spatial measurements — Measurements of distance, area, and volume. These involve the first two dimensions of the image, its width and height.
Density measurements — Measurements involving the third dimension, the pixel values. Pixel values can represent temperature, elevation, salinity, population density, or virtually any phenomenon you can quantify.
Before you can make meaningful measurements, you need to calibrate the image — that is, "tell" the software what a pixel represents in real-world terms of size or distance (spatial calibration), in terms of what the pixel values mean (density calibration), or both. In this section, you will learn how to spatially calibrate digital images.
- Launch ImageJ by double-clicking its icon
 on your desktop or by clicking its icon in the dock (Mac) or Launch Bar (Win).
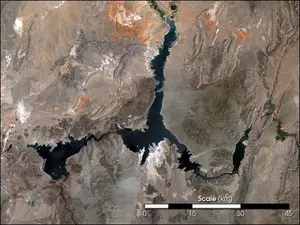
 - Choose File > Open..., navigate to your Day 1 folder or directory, and open the lake_mead_2004_color.jpg image that you downloaded in the Intro to ImageJ section.
This image is a Landsat view of Lake Mead, Nevada, taken in May 2004.
Select What You Want to Measure
ImageJ can collect a number of measurements for you. Before you begin setting a scale and making measurements you need to decide on your measurement options.
- Choose Analyze > Set Measurements....
- The Set Measurements window opens. Check Area and Perimeter (length) to collect those measurements. Then click OK.

Find the Image Scale
If you measure distances or areas on a digital image, your results will be expressed in pixels and square pixels. ("Wait," you say, "Aren't all pixels square?" Actually, no. But that's a topic for another time...) If you want to measure image features in units like meters or square miles, you need to convert pixels to their equivalent "real world" units. You could do this yourself with a calculator, or you could have ImageJ do the work for you. ("Yesssssss!") Giving ImageJ the information it needs to convert from pixels to other units is called setting the scale.
To set the scale in ImageJ, you need to know what the scale is. Here are some ways you can find the scale of an image:
- A scale bar is printed on the image.
- There is a known distance in the image, such as the distance between two landmarks.
- A written statement of scale exists, usually in the image documentation. In this case, the scale may also be called the image resolution. For example, if the image documentation says the resolution is 30 meters, then the scale is "1 pixel = 30 meters."
- Copy the scale from another image of the same scale that has a scale bar or known distance in it.
Set a Scale Using an Existing Scale Bar
Someone was kind enough to put a scale bar on this Lake Mead image, so we'll use it to set the scale.

- Use the straight line selection tool
 to drag out a line across the scale bar. Select Analyze > Set Scale... The Set Scale window opens. The distance you measured in pixels will be displayed. Enter 45 for the Known Distance and km or kilometers for the Unit of Length. To redo your line, click on the arrow tool, then re-click on the line selection tool. This effectively resets the tool.
 - To check the scale you set, use the straight line selection tool
 to drag out a line across the scale bar again. Choose Analyze > Measure. You should get something very close to 45 km in the Results window. If you don't, reset the scale.
 - Measure the distance between two small islands in Lake Mead.
- Practice measuring distances and areas using the different selection tools on the ImageJ toolbar. The small red triangles on some of the tool buttons indicate that additional selection tools are available. Right-click (Win) or control-click (Mac) these buttons to access these "hidden" tools.
- Close the lake_mead_2004_color.jpg image when you are finished.
- Download the image below by right-clicking (Win) or control-clicking (Mac) the link and saving the linked file to your Day 3 directory or folder.
lake_mead_2004.tif (TIFF 2.9MB Jan27 10) - Choose File > Open, navigate to your Day 3 folder, and open the lake_mead_2004.tif image.
This satellite image is a larger version of the one you just worked with. It has a higher resolution which means that it contains more pixels, allowing us to see greater detail. - Use the Straight Line selection tool
 to select the distance from one small island to the other.
 - Choose Analyze > Set Scale....
- Enter 25.4 for the Known Distance and km for the Unit of Length. Compare the scale, in pixels per kilometer, to the scale of the smaller image.
- Now that you have a scale set on this image, zoom in to one of the small islands and measure across it. Being able to make this measurement demonstrates the value of high resolution images.
- Close the lake_mead_2004.tif image.
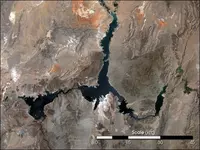
- Click the thumbnail image to the right to open the full size version of the lake_mead_250m.jpg image in a new window. Then right right-click (Win) or control-click (Mac) the full size image and choose File > Save Image As... and save it to your Day 3 directory or folder. Close the image window after you have downloaded its file.

- Choose File > Open, navigate to your Day 3 folder, and open the lake_mead_250m.jpg image.
- Choose Analyze > Set Scale.... Enter the known resolution. In this case, the resolution is in the name of the image file — 250m per pixel. Set the scale to 1 pixel equals 250 meters. Enter 1.0 for the Distance in pixels, 250 for the Known Distance, and meters for the Unit of Length. The reported scale is 0.004 pixels per meter, which is the same as 4 pixels per kilometer.
- Next, measure the distance between the same two islands. Compare your result with the result from the first image, the one with a scale bar.
- Your results should be about the same as the earlier measurements, 25400 m (25.4 km). However, since the resolution of this image is lower than the previous image, it's hard to tell exactly where the small islands are.
- Choose Analyze > Tools > Scale Bar... and enter the settings for your scale bar. The scale bar on the image updates automatically to show you the results of your changes.
- Choose File > Save As and save the file, with scale set and scale bars added, to your Day 3 folder, in TIFF format. This is important because other image formats do not store the scale information with the image. Remember the name of the file - you will need to open it later.
- Visit one or more of the Image Data sources listed below and look for an interesting image—particularly one that might fit into your curriculum. Look for an image that has a scale bar printed on it, a feature or landmarks of known distance, or descriptive information that tells you the scale or size of the image.
- Download the image to your Day 3 folder and use the techniques you learned here to set a scale for the image. If the image does not already have a scale bar, add one. Save your image with your scale bar added, if it did not originally have one, to your Day 3 folder.
- Go to the Part 1: Share and Discuss page and post the image you chose, in JPEG format, with a scale bar added, if it did not already have one. Include an explanation of why you chose the image and what you would have your students do with it or how you would use it in your classroom and engage in an online discussion with colleagues.
Set a Scale Using a Known Distance
Some images don't have scale bars. However, if you know the distance between two landmarks that are easily visible in both images, then you can use that distance to set a scale. Good landmarks are clear, relatively small, as far apart as possible, and obvious. You can use any landmarks you want, but since we already know the distance, we'll use the two small islands we measured in the previous section.
Set a Scale Using Image Resolution
Often you will have to learn more about an image so you can set the scale by directly entering the image resolution. You might find the resolution in a ReadMe file or in the image metadata. (Metadata is loosely defined as the data about the data). The resolution might be right there in the name of the file, or you might even get the resolution in a phone call to the person who provided the image to you. (As a last resort, of course!)
Add a Scale Bar
With the scale set, ImageJ can now print a scale bar on the images for you.
What are the tags in a Tagged Image File anyway?
Your Assignment: Spatially Callibrate and Make Measurements on a Remote Sensed Image
Gateway to Astronaut Photography
The Landsat Image Gallery
MODIS Image Gallery
NASA Earth Observatory Image of the Day Collection (scale bars are on the preview images only - not full resolution)
NASA Earth Observations (NEO)
Image pairs from Earth Obervatory
Earth Observatory: World of Change
EarthKam Images for Investigation
Source
1Adapted from Earth Exploration Toolbook chapter instructions under Creative Commons license Attribution-NonCommercial-ShareAlike 1.0.2Adapted from Eyes in the Sky II online course materials, Copyright 2010, TERC. All rights reserved.
3New material developed for Earth Analysis Techniques, Copyright 2011, TERC. All rights reserved.


