Week 8: Monitoring Fires

top of page

Use Fire Data to Review ArcGIS Basics

In this first section of Week 8, you'll review some of the basic GIS skills you have learned, including turning layers on and off, zooming and panning within them, and working with the data tables linked to the map.

top of page

Download Geographic Data About Fires

  • Right-click the link below to download the zipped file. 
    AspenAM.zip (Zip Archive 39.1MB Apr2 10)
  • Unzip the file. A folder called AspenAM will be created.
  • Move the entire AspenAM folder into Week8 work folder. (Path: C:/eyesinthesky2/week8/AspenAM.)

top of page

Launch ARCGIS and Open the Aspen Fire Project

Shortcut1

  • Launch ARCGIS ArcMap by double-clicking its icon on your desktop or by clicking its icon on your Launch Bar (Win).
  • Choose File > Open, navigate to C:/eyesinthesky2/week8/AspenAM, select the Aspen_fire.mxd file, and click Open.
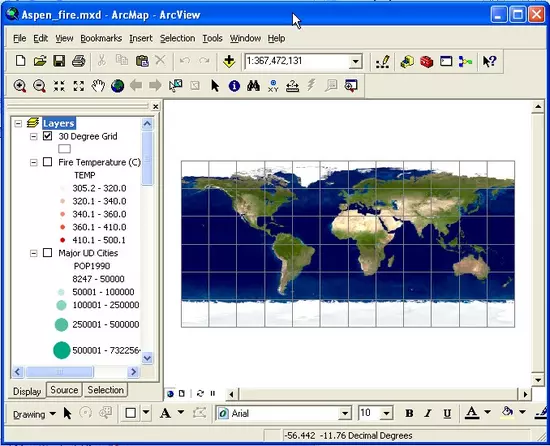
  • When the project opens, the base map displays a satellite image of Earth. 

    The image is part of the Blue Marble collection at NASA. It is a composite generated from several different types of data. Much of the data comes from the Moderate Resolution Imaging Spectroradiometer (MODIS) instrument, a remote sensing device on the Terra satellite. Latitude and longitude lines are visible on top of the image.


top of page

Explore the Data Layers of the Aspen Fire project

  • Scroll down to the bottom of the Table of Contents and turn on the Countries layer.
  1. Scroll down to the bottom of the Table of Contents.
    1 Scroll to Bottom
  2. Turn on the Countries layer by clicking the box to the left of its name.
    2 Turn on Countries


top of page

The Aspen Fire

Aspen_fire_true_color The Aspen Fire started on Tuesday, June 17, 2003, in the Catalina Mountains north of Tucson, Arizona, about two miles from the mountain community of Summerhaven. The fire spread rapidly, fueled by high temperatures and dry conditions and fanned at times by extremely high winds gusting at 40 to 60 miles per hour.

When the summer monsoon rains finally arrived on July 15, the fire was extinguished. By that time the fire had burned 84,750 acres and destroyed 335 structures. Three and a half million gallons of water were used to fight the fire, 400,000 gallons of fire retardant were dropped, and over 1000 fire fighters battled the blaze. The cost of suppressing the fire was estimated at 17 million dollars.

top of page

MODIS True and False Color Images

These remotely sensed images of the Aspen fire were acquired on June 24, 2003 by the MODIS Airborne Simulator instrument carried by a NASA ER-2 high altitude aircraft. (The ER-2 is a research version of the military U-2 spy plane.) MODIS is capable of imaging in 36 different wavelength bands, including several bands in the infrared (IR).

The bottom image is a true color image, approximating what you would see if you looked down on the fire from the plane. The top one is a false color image with Shortwave IR assigned to the red channel, Near IR assigned to green, and Green assigned to the blue channel. Notice how the addition of the infrared wavelengths makes the extent of the burned area easier to detect. The red color does not represent the heat of the fire. Rather, it's the high reflectance in the shortwave IR from the now barren trees and ground. The fire itself appears as bright orange-red strips around the perimeter of the burn area. Note also how well the infrared wavelengths penetrate the smoke, giving a much clearer picture of conditions on the ground.

Living vegetation strongly absorbs at these IR wavelengths and reflects green light, so vegetated areas appear bright green in the image. Rocks and bare ground appear brownish.

Remotely sensed images and GIS data were instrumental in monitoring both the fire and its aftermath. In general, images like these are helping natural resource personnel to better understand and manage fires.

Zoom In Zoom In 
Zoom Out Zoom Out 
Pan Pan 
Zoom to Full Extent Zoom Full Extent 

Movie Icon


top of page

Investigate Attribute Tables in the Aspen Fire Project

Open and investigate several of the Attribute tables for data layers in the project. As you investigate these layers and their data, think of questions that you might be interested in exploring further, such as: "How did the fire spread?" or "Where was the greatest damage?"

. top of page

Investigate the Daily Fire Perimeter layer

  1. Right-click on the PC Daily Fire Perimeter layer in the Table of Contents and select Open Attribute Table.
    17 Daily Fire Open Attribute
  2. In the Attributes of Daily Fire Perimeter table that opens, you can view the individual records for the layer. Scroll across the table until you find the DATE field.

    19 Daily Fire Attribute Table
  3. Select the DATE field header and right-click. Then choose Sort Ascending to rearrange the records in the table in chronological order. The dates are given in a month and day combined format. For example, June 28th is listed as 628. 
    20 Date Sort Ascending


Each record in the Attributes of Daily Fire Perimeter table describes a specific polygon on Earth's surface that was burned by the fire over a one day period and corresponds to a feature on the map. In this case, these polygons show the progress of the fire each day. They contain important information for fire management planning. They show direction and rate of the fire's spread. They are drawn frequently throughout the day by the fire management team. Fires generally slow their progress during the night, giving the fire crews time to recoup and use these maps to strategize a plan of attack for the next day. These maps are also posted in places where they are publicly available, so that everyone involved has the opportunity to be informed.

Movie Icon


top of page

Investigate the Burn Severity layer

  1. Turn on the Burn Severity layer by checking the box to the left of the layer name. Right click on the Burn Severity layer in the Table of Contents and select Open Attribute Table.
    22 Burn Sevferity Right Click Open Attribute
  2. In the Attributes of Burn Severity table that opens, scroll across to the SEVERITY field. Note the categories in this field: HIGH, MODERATE, LOW etc.
    23 Burn Severity SEVERITY field


The Burn Severity layer was created after the fire using satellite data. This map helps managers plan remediation and rehabilitation efforts.

top of page

Investigate the Fire Temperature layer

  1. Turn on the Fire Temperature layer by checking the box to the left of the layer name. Right click the Fire Temperature layer and select Open Attribute Table.
    24  Fire Temperature Open Attribute Table
  2. In the Attributes of Burn Severity table that opens, scroll across to the TEMP field. These temperatures are what is sensed by the MODIS satellite. They are in degrees Celsius.
    25 Fire Temperature Attribute Table
  3. Sort the table by Ascending and Descending to find the range of the fire temperature.
    26 Fire Temperature Sort Ascending


What range of temperatures are in the TEMP field?

Movie Icon


top of page

Explore More If You Have Time

top of page

Resources

top of page

Movies on this Page

top of page

How to download movies

top of page

Flash Video Versions

Download these versions to play on your computer. You'll need an appropriate movie player to view the file, such as Flash Player, Real Player (Mac / Win), or Adobe Media Player.

Movie Icon Exploring Map Layers in ArcGIS

Movie Icon Exploring the Daily Fire Perimeter Layer in ArcGIS

Movie Icon Exploring the Fire Severity and Temperature Layers in ArcGIS

top of page

iPod Versions

Download these version to play on your iPod or iPhone.

Movie Icon Exploring Map Layers in ArcGIS

Movie Icon Exploring the Daily Fire Perimeter Layer in ArcGIS

Movie Icon Exploring the Fire Severity and Temperature Layers in ArcGIS


« Previous Page      Next Page »