Dashboard Setup
Access the Dashboard
After setting up your password-protected account, you will have access to your E-Internship program dashboard using the URL generated for your program. This is the page you will use to manage your students' E-Internship progress, so it is highly recommended that you bookmark the URL for easy access.
Make Changes and Save
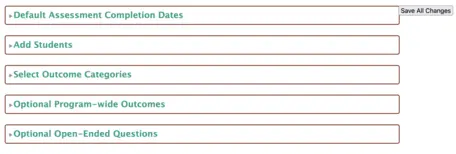
Box 1: Assessment Completion Dates
 Click on the image to expand it.
Note: The dates you are choosing are the 'completion' dates, so be sure to factor in time for students to complete particular steps.
Editing dates: If a particular internship has been delayed for any reason, you can change the default date for any student. The ability to do this appears for each student individually after they have been activated.
Important: After entering or editing the dates, be sure to hit 'Save All Changes.'
Box 2: Adding Student Names and Email Addresses
 Click on the image to expand it.
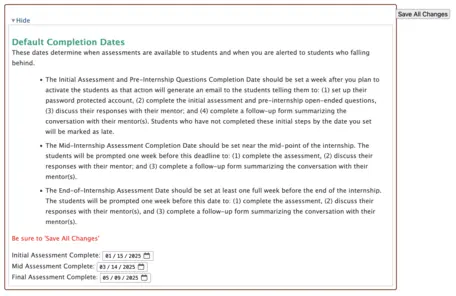
Box 3: Select Outcome Categories
 Click on the image to expand it.
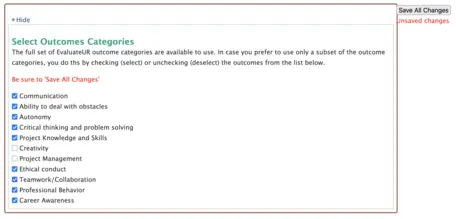
Box 4: Optional Program-wide Outcomes
 Click on the image to expand it.
Box 5: Optional Open-Ended Questions
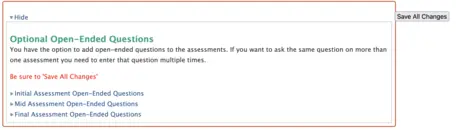 Click on the image to expand it.
Activating Students
 Click on the image to expand it.
Whether you are initially setting up the dashboard, or adding a student after the start date, you will need to activate each student when you want the E-Internship process to begin. Each student you have entered will appear in a block with name and email address once you have selected "Save all Changes." When ready to begin the E-Internship program, you can activate each student individually by selecting "Activate this Student" at the bottom of the block OR you can activate all the students you have set up at once using the "Activate all Students" button below all your un-activated students.
Activating the students(s) will send automated emails to each student, prompting them to set up their account and complete the Student Pre-Internship Assessment.
Tracking the Progress of Each Student
Once activated, each student will appear on your dashboard with a number indicating the step of the process and color-coded boxes indicating the status and progress of each student through the program. The current step number will appear in large font in the student's block, and the box for the step will be highlighted in orange. As steps are completed, the boxes turn green.
After you activate a student, Box 1 on the dashboard will be orange indicating that the Pre-Internship Assessment has been sent to the student and is awaiting completion. The rest of the boxes will be gray, indicating that these steps have not yet been started.
 A screenshot showing student progress in the dashboard.
What's Next?
Once your dashboard has been set up, view the program steps and flow chart to familiarize yourself with the E-Internship process.