Week 2: Analyzing Change Over Time
On this page
Select What You Want to Measure (Set Measurements)
Finding the Image Scale
Set a Scale Using an Existing Scale Bar
Set a Scale Using a Known Distance
Set a Scale Using the Image Resolution
Add a Scale Bar
Explore Image Scale and Measurement
Resources
Movies on This Page
Getting to Know Measuring in ImageJ
In the Intro to ImageJ section, you learned that a digital image is a string of numbers, displayed in a rectangular array, according to a lookup table. You also learned about the three dimensions of an image — width, height, and bit depth. The power of image processing is its ability to make measurements in these dimensions:
Spatial measurements — Measurements of distance, area, and volume. These involve the first two dimensions of the image, its width and height.
Density measurements — Measurements involving the third dimension, the pixel values. Pixel values can represent temperature, elevation, salinity, population density, or virtually any phenomenon you can quantify.
Before you can make meaningful measurements, you need to calibrate the image — that is, "tell" the software what a pixel represents in real-world terms of size or distance (spatial calibration), in terms of what the pixel values mean (density calibration), or both. In this section, you will learn how to spatially calibrate digital images.
- Launch ImageJ by double-clicking its icon
 on your desktop or by clicking its icon in the dock (Mac) or Launch Bar (Win).
 - Choose File > Open..., navigate to your Week 2 folder or directory, and open the lake_mead_2004_color.jpg image that you downloaded in the Intro to ImageJ section.
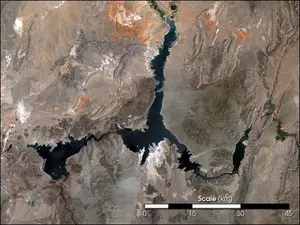
This image is a Landsat view of Lake Mead, Nevada, taken in May 2004.
Select What You Want to Measure
ImageJ can collect a number of measurements for you. Before you begin setting a scale and making measurements you need to decide on your measurement options.
- Choose Analyze > Set Measurements....
- The Set Measurements window opens. Check Area and Perimeter (length) to collect those measurements. Then click OK.

Find the Image Scale
If you measure distances or areas on a digital image, your results will be expressed in pixels and square pixels. ("Wait," you say, "Aren't all pixels square?" Actually, no. But that's a topic for another time...) If you want to measure image features in units like meters or square miles, you need to convert pixels to their equivalent "real world" units. You could do this yourself with a calculator, or you could have ImageJ do the work for you. ("Yesssssss!") Giving ImageJ the information it needs to convert from pixels to other units is called setting the scale.
To set the scale in ImageJ, you need to know what the scale is. Here are some ways you can find the scale of an image:
- A scale bar is printed on the image.
- There is a known distance in the image, such as the distance between two landmarks.
- A written statement of scale exists, usually in the image documentation. In this case, the scale may also be called the image resolution. For example, if the image documentation says the resolution is 30 meters, then the scale is "1 pixel = 30 meters."
- Copy the scale from another image of the same scale that has a scale bar or known distance in it.
Set a Scale Using an Existing Scale Bar
Someone was kind enough to put a scale bar on this Lake Mead image, so we'll use it to set the scale.
- Use the straight line selection tool
 to drag out a line across the scale bar. Select Analyze > Set Scale... The Set Scale window opens. The distance you measured in pixels will be displayed. Enter 45 for the Known Distance and km or kilometers for the Unit of Length. To redo your line, click on the arrow tool, then re-click on the line selection tool. This effectively resets the tool.
- Using the straight line selection tool
 , click on one end of the scale bar, drag to the other end of the scale bar, and click again. (Tip: If you hold down the shift key while selecting with this tool, it forces your selection to be perfectly horizontal.)

- Choose Analyze > Set Scale....

- The Set Scale window opens. The distance you measured in pixels will be displayed. In this case, we got 261 pixels. Your mileage, er pixelage will vary, but it should be close to this. Enter 45 for the Known Distance and km or kilometers for the Unit of Length. For reference, the scale (in this case, 5.8 pixels per kilometer) is displayed at the bottom of the window. Then click OK.


