Part 1 - Navigate to a FieldScope Module and Explore Basic Functions
Step 1 – Navigate to a FieldScope Module
- Go to the FieldScope GLOBE Watersheds Module 1 Web page which opens in a new window.
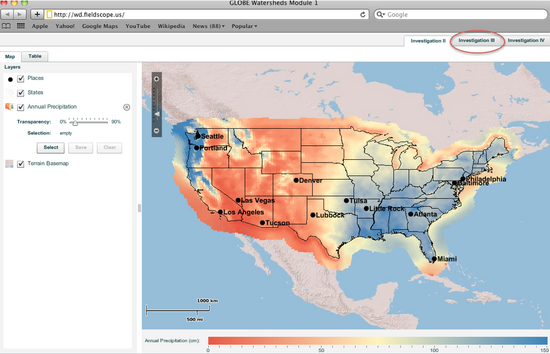
- The Web page opens to Investigation II of the GLOBE Watersheds Module 1. There are three tabs in the top right corner of the screen, indicating which Investigation you are using. The first activity in the Watersheds Module does not use the Web-based GIS, so the Investigations here are II, III, and IV.
- Click on the tab for Investigation III.
Step 2 – Explore Basic FieldScope Functions
- Within each Investigation, you can perform different functions. In Investigation III, there is a Map tab and a Table tab.
- The Map tab currently displays four Layers: 1) Places (Cities), 2) States, 3) Annual Precipitation, and 4) an ArcGIS Online Terrain Basemap.
- Click on the boxes next to the Layer names to turn them "On" and "Off."
- Notice the legend below the map which shows the name of the Annual Precipitation layer and the units (cm of water). Also displayed is a color key legend with the units and range of values for the displayed variable.
- Zoom in and out of the view by using the plus and minus bar on the left side of the map.
- Click and drag in the map to move it.
- Locate your home town and click its location on the map. On the legend, the value of the Annual Precipitation at that point will show up.
- The precipitation Layer has a transparency slider and a Save button. The Save button allows you to save selections to a table.
- Click on the Table tab. In the Table display, you can view a map table. A map table is a way to visualize multiple sets of data at the same time. The maps are linked so you can work with them all at once.