Uploading Files/Images
Files on your local computer, whether they are Word documents, JPEG images, or Quicktime movies can be uploaded to Serckit and then embedded into your web page using appropriate tags.
 Click the 'Upload File/Image' button in the sidebar to open the File Upload box.
 Uploading Files
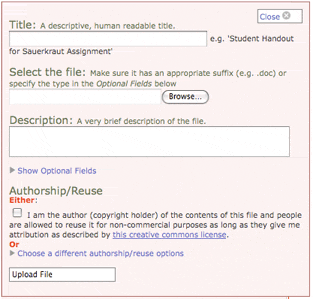
Clicking the upload file/image button in the sidebar will open the dialog where you can upload a file off your local computer. Provide a title, use the browse button to select the file on your hard drive, provide a one or two sentence description and indicate who the file belongs to and how others are allowed to reuse it.
Once you click the upload button the system will upload your file (how long this takes depends on the size of the file and the speed of the Internet between here and there). Once the upload is complete the system will display an example tag that includes the unique identifier it has assigned to the file you just uploaded. Inserting this tag into your page will embed that file into the page at that point.
Is it a File or an Image or What?
When you upload a file Serckit tries to discern what type of file it is based on the the 3 letter suffix of the file (.pdf or .doc or .gif etc...) Depending on the file type it can either be embedded in your page as an image that is displayed directly using an [image] tag (if the file is a .gif, .jpg or .png) or it is treated as a generic 'file' and so is embedded with a [file] tag. The file tag presents the file as a link which people can click to start a download. We'll cover how to use these tags below and in the pages that follow.
If you don't have a suffix on the file (as it sits on your computer) or if your file isn't a commonly recognized type this process may get confused. If you have a uncommon file type you'll want to make use of the 'show optional fields' link in the upload dialog. It will allow you to specify the type of the file as well as the name the file will be downloaded with so that you can ensure folks using your materials receive it with the correct suffix intact.
Get the Authorship/Reuse Info Correct
It's important to put the correct details into the authorship/reuse section. This information is made public. Folks who might want to reuse something you've uploaded will rely on you having provided accurate information. If you're unclear on how to fill out this section check out our information on copyright for authors.
Working with Uploaded Files
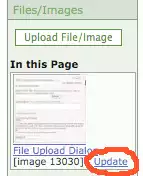
The sidebar contains a list of files and images embedded in the current page as well as those most recently uploaded to this area of the site. Clicking the update link next to a file will open a new window onto screen where you can edit the details you provided about the file (title, description, etc...) as well as upload newer revisions of the file.
Revisions
When a new revision is uploaded the new version will replace the previous version throughout the site. You can provide a description of what is 'new' about this revision (so you have an historic record) and choose to retain the previous version either for a fixed period (so the file is on hand long enough to be sure the older version isn't needed), indefinitely or not at all. Earlier revisions (that have been retained) will be listed here as well for download.
Finally, an option is provided to delete the file (which will delete all previous versions). Note that if the file is currently being referenced in a page you won't be allowed to delete it until those references have been removed.

Embedding a Link to this File in Your Web Page
Once uploaded you can use the file id the system has generated to embed a link to file within your web page. The syntax is for example [file 12]. Each file is assigned a unique number ('12' in this example) which you use along with some text for the link itself (in place of the single-quoted 'link text' in the example). Just stick the [file 12] tag in the midst of your page and a link making it available for download will be displayed. You may optionally supply some text that will show up as the link to the file rather than the file title (which is the default): [file 12 'link text']
If the file you uploaded is an image that can display within the web page rather than being offered up for download (either a .jpg, .gif, or .png image) then you need to use the image tag described on the next page.
Private Files and the TeacherStash
In some cases it's useful to make specific files private, so they can only be downloaded by people with approved accounts. One common case is when working within a private workspace (e.g. to coordinate internal work on a project). Files uploaded within private workspaces are automatically marked as private and can only be downloaded by people who have editing access to the private workspace. This applies no matter where the corresponding [file] tag is used in Serckit. Even if it's added to a public page. Private files added to public pages will appear as a normal link but the link won't function for people not logged into an account with appropriate access.

![[creative commons]](/images/creativecommons_16.png)
When a non-approved person clicks the link they'll be guided to create an account (or login to their existing one) and then fill out a form to request access. These will flow to a standard submission queue (from which you can receive email notifications) where you can read the request and approve or deny them. This will automatically grant appropriate access and notify the original requester. In the case where you want to limit access to instructors (faculty or teachers) you can take advantage of Serckit's built-in data that tracks known instructor accounts (as vetted by other TeacherStashes, workshop participation and professional society membership) and allow them immediate access.