Guide to Instructor Dashboard
This documentation is to support instructors using their dashboard to set up and manage their EvaluateUR-CURE program.
The dashboard is where instructors carry out basic E-CURE functions such as: adding and activating students; entering dates when they anticipate that students will start their research, reach the mid-point, and complete the research; keeping track of student progress, including what steps have been completed and what steps have not been completed; previewing the surveys or actions to be completed; and viewing and exporting data.
Initial Steps - Getting Started
If you are just setting up your program to use E-CURE, you will need to go through the full Onboarding process, where you can also view a Dashboard Tour video for an introduction to the features detailed in this guide.
You will need to have your password-protected account set up before accessing and setting up your dashboard.
Accessing your Dashboard
After you set up your password-protected account you will have access to your E-CURE dashboard using the URL generated for your program. You can access your dashboard using the link below, or from the top navigation bar.
Setting up the Dashboard or Making Changes to the Program
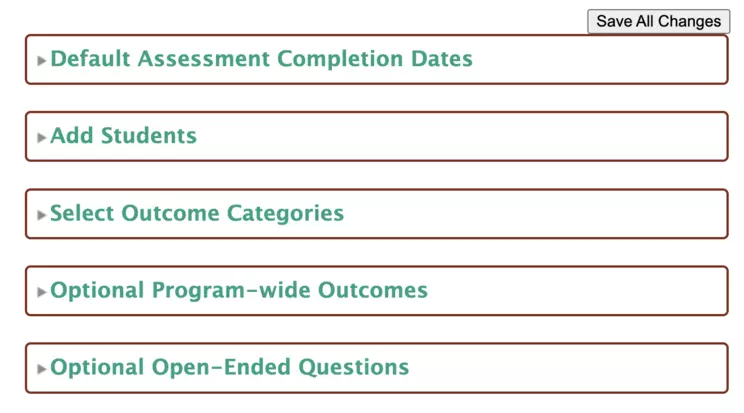
Box 1: Default Assessment Completion Dates
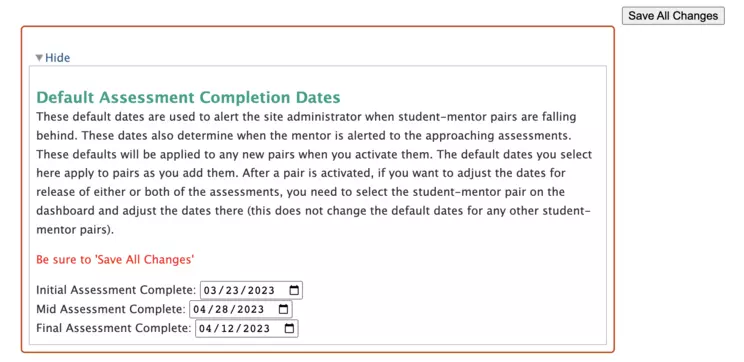
Setting dates: These are the dates you will use for completing steps in E-CURE. To determine the dates to enter in this box, plan around the timing of the start and end of the research experience. View a detailed E-CURE Timeline for planning purposes.
Pre-Research Deadline: This is the date by which all Pre-Research steps should be completed. Before this date, you and your students will need to complete the Pre-Research Assessment, students will fill out the Pre-Research Survey, and you will need to review responses from each student. Choose a date before your research project begins, giving yourself enough time prior to complete the assessments and review them, likely after the first or second week of the course.
Early/Mid-Research Deadline: This is the date by which all Early/Mid-Research steps should be completed. By this date, you and your students will complete the Early/Mid-Research assessments. A week before the date set, you will be prompted to begin these assessments. Choose a date at least two weeks after the research project has begun in your course.
End-of-Research Deadline: This is the date by which all End-of-Research steps should be completed. By this date, you and your students will need to complete the End-of-Research Assessments, students will fill out the End-of-Research Survey, and you will need to review responses from each student. Choose a date before the end of your course and/or research project, making sure to leave time to have class conversations or meet with students to discuss their final score reports and survey responses.
Editing dates: If you wish to change the default dates for all students once E-CURE has started, you may change the mid-research or end-of-research dates. If you wish to change default dates for a student without altering dates for all students, select that student at the top of your dashboard instead, and select "Edit" under the section for Assessment Complete Dates.
After entering or editing the dates, be sure to hit 'Save All Changes'.
Box 2: Adding Student Names and Email Addresses

Automated messages are sent to the email addresses you enter in Box 2. It is very important that you carefully enter your students' names and email addresses, using email addresses will be checked often. After entering this information, be sure to hit 'Save All Changes.' Once you do this, you will be able to activate the student. You are able to enter the students as soon as they are enrolled in the research program can activate them when you are ready to start EvaluateUR. If a student leaves during the course of the research, you have the option to delete the student using the "Delete this student" option in the top left of the student's block. You also can add any student later after you start EvaluateUR.
Box 3: Select Program-Wide Outcome Categories
For larger programs, it is unlikely you can observe and interact with all the students using all of the outcome categories. Use this box to select a sub-set of outcome categories. Be sure to save all changes after doing this. If you advance to STEP 5 before completing Box 3, all of the outcomes will be used.
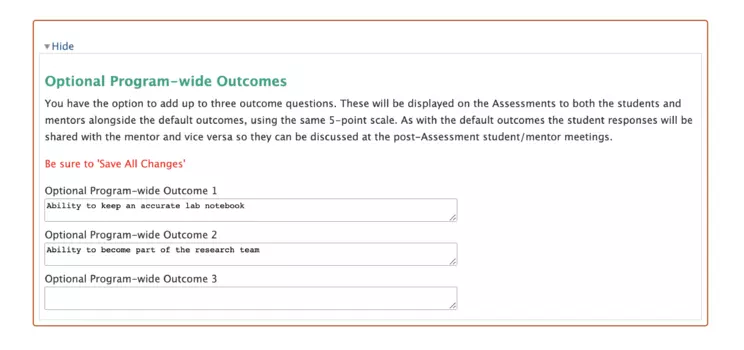
Box 4: Optional Open-Ended Questions
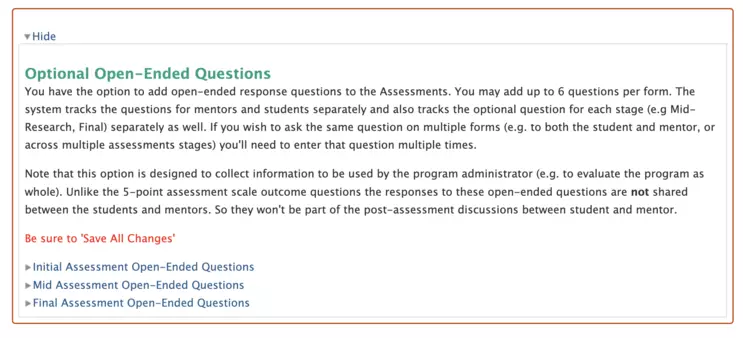
In case there are additional outcomes that apply to your research program, you can add up to 3 additional outcomes here. These outcomes will be included on the assessments in Step 5 and after. Be sure to hit 'Save All Changes' if you add outcomes.
Activating Students

Whether you are initially setting up the dashboard, or adding a student after the start date, you will need to activate each student when you want to E-CURE process to begin. Each student you have entered will appear in a block with name and email address once you have selected "Save all Changes". When ready to begin the E-CURE program, you can activate each student individually by selecting "Activate this Student" at the bottom of the block OR you can activate all the students you have set up at once using the "Activate all Students" button below all your unactivated students.
Activating the students(s) will send automated emails each student, prompting them to set up their account and complete the Student Pre-Research Reflection.
Tracking the Progress of each Student

![[creative commons]](/images/creativecommons_16.png)
Once activated, each student will appear on your dashboard with a number indicating the step of the process and color-coded boxes indicating the status and progress of each student through the program. The number current step will appear in large font in the student's block, and the box for the step will be highlighted in orange. As steps are completed, the boxes turn green.
After you activate a student, Box 1 on the dashboard will be orange indicating that the Pre-Research Reflection has been sent to the student and is awaiting completion. The rest of the boxes will be gray, indicating that these steps have not yet been started.
Pre-Research Steps (1 through 4 on the Dashboard)
Steps 1 to 4 should be completed for each student before the research begins. The current step will be highlighted in orange and indicated by number in the block for each student. By clicking on the block you will be able to expand the view to see when each step was completed.
Step 1 - Student Pre-Research Assessment
Step 1 is initiated when you activate the student. The student will be prompted via automated email to create an account and complete the Pre-Research Assessment followed by the the Pre-Research Reflection. You will be notified of this by automated email. Once the student submits their Pre-Research Reflection, this step will be marked complete and Step 2 will begin.
If any students are on Step 1 as the Pre-Research Deadline approaches, consider reaching out to students to see if they have been able to create and log into their accounts, and ensure that they are receiving the automated email prompts.
Step 2 - Student Pre-Research Reflection
Step 2 begins once a student submits their Pre-Research Assessment. The student will then be prompted to answer the open-ended questions in the Pre-Research Reflection. When they have submitted their reflection responses, you will be notified by email and the student will advance on the dashboard to Step 3.
Step 3 - Instructor Reviewing Pre-Research Assessment and Reflection
Step 3 automatically begins once the student has submitted the Pre-Research Reflection. The student will receive an email notifying them that their instructor will review their Assessment and Reflection. You will receive an automatic email informing them that the student has submitted the Pre-Research Reflection and prompting you to complete the review of each student's responses.
Follow instructions in the dashboard to review survey responses from each student and submit your feedback. For each student, you will be given the option to customize your response or to send a generic message indicating that you have reviewed the student's reflection. Submitting the message to the student will advance the student to Step 4.
Step 4 - Waiting for Release of Early/Mid Research Assessment
Step 4 begins once the Instructor completes their review of the Pre-Research Reflection. The student will receive an email notification that the review is complete, with a link to read the response from their Instructor. The Instructor is notified that their review has been sent to the student. Both student and Instructor will be prompted to discuss the reflection further in preparation for the release of the initial assessment.
The dashboard will read "Waiting for release of Early/Mid Assessment" during this step. You do not need to start the Early/Mid Assessment until the intended time in your course or research. You will be reminded by email as that date approaches. During this time, it is recommended to meet with students to discuss their responses to the Pre-Research assessment and reflection.
Early/Mid-Research Steps (5 through 7 on the Dashboard)
Step 5 - Instructor Early/Mid Research Assessment
Step 5 begins automatically when the Early/Mid research date you set at the start of the program is reached. You will be prompted to start the Early/Mid Research Assessment for each student. You will need to fill out an assessment in order to advance each student to Step 6.
For each assessment has been submitted, Step 5 will appear as complete on your dashboard view, and the student will receive an email prompt to fill out their assessment.
It is very important that instructors respond quickly to this message and take appropriate action.
Resetting Early/Mid-Research Date: If the course or research is not on track with with the date set previously for Mid-Research, select "Return to Step 4". You will then need to re-set the date for the mid-research point for this student. This will set the Dashboard back to Step 4 to repeat the reminders in Step 5 when the new date approaches.
Step 6 - Student Early/Mid-Research Assessment
Once you have filled out a student's Early/Mid-Research Assessment, the student will begin Step 6. The student is notified by email and prompted to fill out the Early/Mid-Research Assessment. Once they complete their assessment and submit it, they will advance to Step 7.
Step 7 - Waiting for Release of End-of-Research Assessment
Step 7 begins once the student has submitted their Early/Mid Research Assessment. The student will be notified and sent a link to view their score report for comparison between their responses and yours.
The dashboard will read "Waiting for release of End-of-Research Assessment" during this step. You do not need to start the Early/Mid Assessment until the intended time in your course or research. You will be reminded by email as that date approaches. During this time, it is recommended to meet with students to discuss their responses to the Early/Mid Research assessment.
End-of-Research Steps (8 Through 12 on the Dashboard)
Step 8 - Instructor End-of-Research Assessment
Dashboards will automatically move ahead into Step 8 when the End-of-Research date set at the start of the program is approaching. You will receive an email notification and a link to complete the End-of-Research Assessment for each student.
You will need to fill out an assessment in order to advance each student to Step 9.
For each assessment has been submitted, Step 8 will appear as complete on your dashboard view, and the student will receive an email prompt to fill out their assessment.
It is very important that instructors respond quickly to this message and take appropriate action.
Step 9 - Student End-of-Research Assessment
Once you have filled out a student's End-of-Research Assessment, the student will begin Step 9. The student is notified by email and prompted to fill out the End-of-Research Assessment. Once they complete their assessment and submit it, they will advance to Step 10 to complete the End-of-Research Survey.
Step 10 - End-of-Research Survey
Step 10 begins when the End-of-Research Assessments have been completed. In the step each student fills out the End-of-Research Survey. Once the survey is submitted, the student will move to Step 11 on the dashboard, and you will be notified to review their responses.
Students will also be notified that their final score reports are available.
Step 11 - Instructor Reviewing End-of-Research Survey
Step 11 begins once the student has submitted the End-of-Research Survey. The student will receive an email notifying them that their instructor will review their Assessment and Survey. You will receive an automatic email informing them that the student has submitted the Survey and prompting you to complete the review of each student's responses.
Follow instructions in the dashboard to review survey responses from each student and submit your feedback. For each student, you will be given the option to customize your response or to send a generic message indicating that you have reviewed the student's survey. Submitting the message to the student will advance the student to Step 12.
Step 12 - Finished
The dashboard will show that the student has completed E-CURE once the reviews have been submitted. The data for students that complete all 12 steps will be viewable in the "View and Export Data" tab. Learn about Using your Score Reports