
Unit 1: Hazards, vulnerability and risk
Brittany Brand (Boise State University), Pamela McMullin-Messier (Central Washington University), Melissa Schlegel (College of Western Idaho)
Summary
Students will identify and apply credible geologic and social science data sets to identify local hazards and vulnerable groups and structures, and assess risk for their community.
Learning Goals
- Students will list and describe the top three to four natural hazards that may exist in their region. They will also identify vulnerable groups and structures in their area.
- Students will identify and label areas prone to natural hazards on a map that includes all or a section of their community, including a well-referenced reasoning for why and how often hazards may occur.
- Students will map areas of social vulnerability including groups (e.g. social class, gender, race, and age) and structures (e.g. hospitals, schools, and bridges) onto the same mapping area.
- Students will overlay their hazard and vulnerability maps to determine community risk, specifically identifying zones that constitute various levels of risk (e.g. high, moderate and low risk). Students must justify their designation of risk levels for the map.
Context for Use
Unit 1 is appropriate for a range of educational levels including introductory geoscience or environmental science courses, upper-level natural hazards courses, and social science or interdisciplinary courses dealing with the interactions of society with natural hazards. Unit 1 can be used most effectively in relatively small classes (<40 students) in lecture and lab settings. It can also be adapted for a senior-level GIS project.

![[reuse info]](/images/information_16.png)
Unit 1 is expected to take two to three class periods.
Necessary materials for Unit 1 include:
- Access to computer with PowerPoint
- Access to the Internet
Important: The students should take the formative assessment survey (pre-module) before beginning Unit I of the module. This is meant to give both the instructor and the students a baseline of knowledge to compare with the summative assessment survey (post-module) after the module is complete. Please be sure to un-bold the correct answers before printing and giving to students.
Also Important: Instructors will provide students with the Natural Hazards Survey (Microsoft Word 2007 (.docx) 25kB Oct19 14) prior to the start of the module, as this is an important step in the module for students to disseminate the survey to their social networks to create a data set for analysis. Instructors, please read Help for Google Docs for Natural Hazards Survey (Microsoft Word 2007 (.docx) 22kB Oct19 14), which explains how to create the social survey specific for your class and obtain the web link to share with students. Students should distribute the survey as soon as possible before the start of the module in order to get a large number of responses. Students should also take the survey themselves so they (1) are familiar with the questions, and (2) are participants in the study. Instructors may choose to have the students take the survey at the beginning of the term, before engaging in other course materials, or at the start of the module. Students will be evaluating and analyzing this survey data in Unit 2.
A full list of files available for Unit 1, both required and optional, can be easily obtained here:
Before beginning Unit 1 students will need to have a basic understanding of natural hazards, vulnerability and risk:
- Introduction to Natural Hazards (PowerPoint 2007 (.pptx) 1.4MB Oct28 14) - This lecture introduces and outlines natural hazards.
![[creative commons]](/images/creativecommons_16.png)
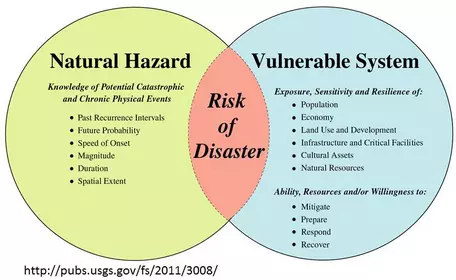
The instructor may choose to discuss the definition of risk with the class in simple terms (i.e., overlap of a natural hazard and vulnerable system — see photo to the right), or provide the following lecture as an introduction to Unit 1:
- Introduction to Risk and Vulnerability for Geoscience Courses (PowerPoint 3.8MB Oct28 14) - This lecture introduces and outlines risk and vulnerability for geoscience courses and also includes an optional case study reading based on Baberi et al. (2008).
- Introduction to Risk and Vulnerability for Social Science Courses (PowerPoint 485kB Oct27 14) - This lecture introduces and outlines risk and vulnerability for social science and Interdisciplinary courses.
Additional information and materials can be found in "References and Resources" below.
Description and Teaching Materials
Instructors will advise students to form groups of 2–4 students and provide the following materials for the module:
- Introduction to the Module (PowerPoint 2007 (.pptx) 909kB Oct28 14)
- Unit 1 Student Instructions (Microsoft Word 2007 (.docx) 23kB Oct19 14)
- Credible Data Interpretation (PowerPoint 2007 (.pptx) 461kB Oct28 14)
- Links to US Hazard Maps (PowerPoint 2007 (.pptx) 2.4MB Oct21 14) ; Note: Instructor should also provide students with examples of your city/township, county, and state resources with hazards maps.
Activity 1:
Part A: Remind students to distribute the survey to a minimum of three local friends and/or family members. Suggested groups may include sports teams, study groups and classmates. Students can encourage their friends to send the link on as well! The more data received, the more interesting the results!
Part B: Instructor should lead group discussion or "think, pair, share" on vulnerability, hazard and risk (e.g. how would you define hazard, vulnerability and risk). Students will be given a PowerPoint document with a mapped area (Note to instructor: instructor must choose mapping area for student consistency; instructor will give map rubric and expectations to students before starting Part B). Students will be given class time to research local hazards and vulnerabilities. Students should be instructed to use and cite credible data sources.
Important: The instructor must choose a reasonable map area for the students. This keeps the exercise consistent, efficient and provides maps at an appropriate scale (Note: this will be different for every "community"). We encourage the instructor to look at the following examples provided. Instructors may choose to share these examples with the students as well to help them visualize the expectations.
Examples:
For instructors -
For instructors -
1. Instruct students to identify and locate regions within the map that are susceptible to hazards. Instructor will indicate number of hazards necessary to include in your map. Use one map (slide) per hazard. Label the slide with the hazard. Draw shaded (but 60% transparent) shapes around the hazard area in each map (use a different color for each hazard). Combine hazard shapes (copy and paste) onto a single map slide (make sure to align the shapes properly). Include a key and cite the sources.
- This file will help guide students on how to create their maps - Powerpoint Tutorial for Unit 1 (Microsoft Word 2007 (.docx) 16kB Oct28 14)
- Hazard Map Template (PowerPoint 2007 (.pptx) 60kB Oct19 14)
2. Using Google maps (or another equivalent), students should locate the following structural vulnerabilities on their maps: major transportation routes, major bridges, hospitals, retirement homes, and schools. Once vulnerabilities are compared and located in Google maps, use the print screen function on your keyboard, which copies the screen. Paste (ctrl+v) the map into a new PowerPoint slide. Under format, crop the image to the original map dimensions (you may have to re-size the map by clicking and dragging the image corners). Alternatively, students can use "insert objects" or "insert line" options in PowerPoint to place or highlight each vulnerability on a blank version of your assigned mapping area.
3. Students should also be encouraged to examine social vulnerabilities, where students can examine the percentage of the population below poverty, under age 18, female, minority, homes constructed pre-1950, etc. An excellent source to explore this without having to know how to use GIS mapping is the Environmental Protection Agency's EJScreen (Environmental Justice Screening and Mapping Tool): EJ Screen To find a map for your location, you can enter a zip code, city, or county. Then click on "Map Data" and select "Map Supplementary Demographics" (We suggest using '2008-2012 ACS' for more recent population estimates) and click on a category and variable that you would like to examine — e.g. to examine populations in your area that are vulnerable to poverty, select the category "Income/Poverty" and then select the variable "Pct Population Below Poverty Level" to get a visual (you can also select the colors) of the percentage of population at risk - be sure to click on "Add to Map". More information and instructions on how to use the mapping tool can be found at: Learn How to Use EJ Screen
4. Combine composite hazard map and vulnerability map into a new slide. Determine areas of very high risk (maroon), high risk (red), moderate risk (orange) and low risk (yellow; include key). Explain reasoning on a new slide entitled "Areas of Risk Reasoning."
Teaching Notes and Tips
Necessary instructions and materials for the instructor (and students) are provided below, as this represents a breakdown of how the module is to be assessed:
For instructors:
For students: Student Road Map and Grading Scheme for Module (Microsoft Word 2007 (.docx) 19kB Oct19 14)
Assessment
At the start of the module, instructors should provide students with a formative assessment to evaluate students' understanding of the materials made available to them prior to the start of the module, so adjustments can be made if necessary.
For instructors -
Students should be provided with the map activity rubric prior to the start of Unit 1 to explain expectations and how they will be evaluated: Unit 1 Rubric (Microsoft Word 2007 (.docx) 19kB Oct19 14)
References and Resources
News Articles on Hazards and Risks (Microsoft Word 2007 (.docx) 18kB Oct29 14) — This document has several links to articles that will familiarize the instructor and students with hazards and risks.
BIA Risk Assessment Code Matrix — a business impact assessment for examining the intersections of hazards and risks.

