Using the Course Status Page
Your course status page is automatically generated after you complete the course setup form. Each course has its own unique course status page that only the instructor can access. The page provides a way for InTeGrate to keep the data from your students together to ensure that we can match IRB consent, pre-instruction data, summative assessment data, and post-instruction data. The course status page is the place where you will upload electronic data to InTeGrate. You can use it to track completion of the pre- and post-instruction attitudinal surveys for your course. It also serves as a means of communicating the progress of data collection between InTeGrate and instructors.

![[creative commons]](/images/creativecommons_16.png)
Reach your Course Status Page through your Account Page
In addition to the direct links that you received via email after filling out your course setup form, you can reach your course status page (or pages if you have more than one course or section) through your account page. If you don't see a courses section on your account page (as outlined in the image to the right) then it means you haven't successfully filled out a course setup form.
Visit your Account Page »
Example of the course status page
Here is an example of a course status page which has been annotated with its features.

Provide and update your student ID roster

You can update the course roster with student additions, drops, or changes in student ID numbers at any time during your course. Keeping this list up-to-date will help you know what the completion rate is for online surveys and other assessment data. You can update this list at any time, as many times as necessary.
To update your roster, use the box titled "Upload Roster" of the left side of your course status page (see example above and on the right). If this is not the first time you are uploading a roster, click on the words "Show roster update form." The box will expand and will provide more directions and a white area for you to paste in your updated student ID roster. Please list one student ID per line with no additional punctuation to separate entries. Push the "Submit" button to upload the roster.
Access the links to your unique online pre- and post-instruction survey
Your survey links can be found at the left side of the course status page in a green box titled "Student Surveys" (see example above). Click on the survey you want (pre- or post-instruction). The survey will open. When providing the URL for students be sure you copy the entire URL. The survey URL is unique to your class to allow your students to be tracked through all data collection, so please don't share survey URLs with others. The surveys are only open for a limited time, which is based on the dates you enter, so if your dates change, make sure to update that info in your course status page (details provided in the following section).
Edit course and assessment dates
When you filled out the course setup form, you provided InTeGrate with several dates. If the dates you entered have changed, you will want to update them on your course status page. This is important because the pre-instruction and post-instruction surveys remain active for a limited time and open and close automatically based on the dates you enter. Also, having accurate dates will help us know when to expect data to be uploaded or mailed to the office.
On the course set-up form, you entered dates for:
- the beginning and ending dates for the semester in which you will teach the module
- when you will administer the pre- and post-instruction GLE and attitudinal surveys
- when you will teach the module
- when you will administer summative assessment
- when students will complete the pre- and post- GLE questions
To change the dates you entered, find and click on the link that says: "Edit Course," near the top left corner of your course status page (see example above). Change dates as needed and then be sure to hit the "Update" button at the bottom of the page to save your changes.
Change the ID prompt instructions on the pre- and post-instruction attitudinal survey
When you filled out the course setup form, you typed in a prompt that is intended to help students identify and enter in the correct ID number to the pre- and post-instruction online survey. If you find you need to further clarify your instructions or have decided on a different ID system, you can edit these instructions. To do this, find and click on the link that says: "Edit Course," near the top left corner of your course status page (see example above). Change the prompt as needed and then be sure to hit the "Update" button at the bottom of the page to save your changes.
Track the status of online survey completion
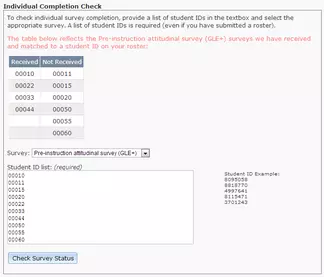
There are two ways to do this, depending on if you want just the percent of students who have completed the survey or if you want to know which students have completed the survey.
- If you want only the percent of students who have completed the survey, look for "Completion Stats" in the "Student Surveys" box on the left side of your course status page, underneath the student attitudinal survey links (see example above). The percent completion rate should be directly on the page.
- If you would like to know which students have completed the survey (to know which students you should ask personally to complete the survey, to assign credit or extra credit, etc.) use the "Student Surveys" box in the bottom left of the course status page (see example above and on the right). Select which survey you are investigating with the pull-down menu. Then, enter in your list of student IDs following the example (one ID per line, no punctuation). Push the "Check Survey Status" button. The display will then show a list of student IDs for students who have completed the survey AND a list of student IDs for students who have not completed the survey. Note: you must input your student roster or the ID numbers of the students you want to check each time, even if you uploaded a roster in the box above this one.
Unknown student IDs
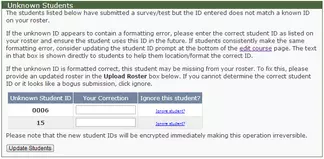
If a survey is submitted with a student ID that does not match the roster you uploaded, the ID number will appear in an "Unknown student ID" box in the upper left corner of your course status page (see example on the right). This box will only occur when there is a problem matching a student to your roster. Potential causes and solutions for this include:
- A student typed in a different ID number than you had intended (e.g. if your institution has two student ID numbers). If this is the case, you may want to revise the prompt instructions provided on the survey form using the editing tool described in the ID instruction section (above).
- A mismatch occurred due to the inclusion or omission of leading or trailing zeroes on a student ID number. This can likely be prevented by specifying how long a student ID number is in the ID prompt section of the survey (e.g. your 8-digit student ID number).
- A student added or dropped the course, but isn't on the roster you uploaded. To remedy this, you can upload an updated student roster (described above).
- A student mis-typed their student ID number. If you can positively identify the student who mis-typed their ID number, you can correct that entry in the box next to the mismatched student ID. Note: this is irreversible, so you should be sure that you know which student the mis-typed ID belongs to.
Upload electronic copies of data (completed student consent forms, surveys, summative assessment, etc.)

Uploading electronic copies of your ungraded student work is the preferred method of providing it to SERC. You can upload scanned copies of completed student work directly to your course status page using the upload tool on the right side of your course status page, in the box titled "Upload Files" (see example above and on the right).
Provide a short description of the contents of the file(s) you're uploading (e.g. signed consent forms, summative assessment, etc.). If you are uploading many files at once, please upload them as a ZIP file (instructions provided on your course status page). Remember to submit materials with student ID's, but no student names (except for IRB, which should have both).
If you have a question that is not addressed on this page
If you have a question about how to use your course status page or need to request a change be made to your course status page that is not covered above, please contact your webteam liaison. They will answer your question or pass it along to the relevant contact(s) to resolve your question or request.